Thursday, June 3, 2010

Primrose

There are many varieties of Primroses. These bloom from late spring through early summer and prefer full sun to partial shade. They seem to grow best in soil that is somewhat sandy.


The picture below shows some that were transplanted earlier this spring. I like primroses best when they are mixed with other flowers like the picture above.

Hen and Chicks

Hen and Chicks, a succulent, prefer full sun to partial shade and are known to flower at times. The large "hen" in the center of the plant was the start to this plant. The smaller "chicks" are growing off the "hen" and can be transplanted to start new plants.

This one is being crowded, so once the flowers surrounding it are done blooming for the summer, some of the plants will need to be moved around.
My niece grows these in her rock retaining wall. She plants them in the little crevices between the rocks and they grow!

Lupines

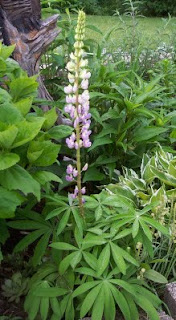
Lupines bloom from late spring through early summer. This one is just getting started.
This particular variety grows from 25" to 30" tall and prefers full sun to partial shade. Cutting the faded flowers at the base of the plant will help keep them strong and healthy.

We didn't plant this one here. Lupines are self seeding, so it's possible that some of the seeds from another part of the garden were carried by a bird or the wind to this spot. It will be crowded by the Hibiscus and Hosta it is growing next to and will need to be moved once it is done flowering.

Honeysuckle

Honeysuckles bloom from late spring through the summer. They attract hummingbirds, butterflies and bees.

Fast growing, they prefer full sun to partial shade. Give them lots of space to grow! Some varieties grow as tall as 30 feet and can be trained to climb a trellis. This one is overgrowing the butterfly garden. It's already been cut back once this spring.
I was just reading the you can take cuttings from the honeysuckle in the spring, place them in a glass of water until they start forming roots and plant them....I think I'm going to try that!

Coral Bells

Coral Bells, also known as Heuchera or Alumroot, come in a variety of flower and leaf colors.
They prefer full sun to partial shade. Depending of the variety, the dainty flowers can grow from 15" to 36" tall. The leaves at the base of the plant grow to a height of 12" - 24" tall.

Coral Bells are blooming now. Cutting off fading flowers and wilted leaves at the base of the plant will keep these flowers blooming well into the summer.

Water only when the top 1" of soil is dry. These flowers don't like to be over watered.


Divide these in the spring every 3-4 years, discard any older woody growth.

Bleeding Hearts

Most of the Bleeding Hearts are done flowering. This one is still hanging in there. Bleeding Hearts are one of the first flowers in the spring to start blooming and one of my favorites. This one is over 3 feet tall.


Tips for growing Bleeding Hearts:
1. Don't hoe around them in the spring. Pull only the tall weeds. Bleeding hearts multiply in the spring, so if you weed and hoe to early, you will end up weeding new starts.
2. Place them among plants and flowers that bloom in the summer. When this plant is done flowering, it will start to turn brown and ugly. Bleeding Hearts need to die back before they are cut down so if you hide them among the summer flowers, the brown leaves and stems won't be so noticeable.
3. Bleeding Hearts prefer mostly shaded areas with some sun.
4. If they don't seem to be flowering or if the flowers aren't very pretty, it probably means they need water.

The Strawberry Patch

Strawberries ready to pick!

We have always had a problem with the grass from the yard growing into the strawberry patch. This year, we dug all of the grass away from the edge of the garden and used old boards as edging. The boards are placed about 4" into the ground so we can mow right over the top of them.


Wednesday, June 2, 2010

Spiraea Babies


This little guy was growing about a foot away from a larger spiraea. I'm going to try and transplant this one to see if it will grow.

Spiraea Shrubs

The Spiraeas are starting to flower. If trimmed after they are done flowering, they will usually flower again.
Spiraeas need pruning every year. Dead and wilted branches should be cut off close to the ground and sticks and leaves that may have collected along the base of the plant should be removed. I filled a wheel barrow with branches from this one.

Rock Border

Unusual rocks are stacked along the edge of the patio to create an interesting border.

Tuesday, June 1, 2010

Rain Got Your Peonies Down?

Cut them for an old fashioned bouquet.
Caution: Ants are attracted to the nectar in the flowers. Remove any of these critters before bringing inside.

Creative Container for Plant Exchanges

A wine bottle holds a vine with a long root.
I got this one from my awesome niece.
Thank you!

Too Cute!

A planter filled with colorful annuals.

Snowbird Potentilla

In desperate need of pruning!


Removing all of the dead branches will rejuvenate the Snowbird Potentilla.


Hiding the Dog Kennel


Purple Iris plants, a white Clematis and 2 Spireas add color and hide the kennel.

Friday, May 28, 2010

Potting Calla Lilies


We lost our calla lily bulbs a couple of years ago when we neglected to dig them up before it froze. This year, we got some new bulbs from a friend we were exchanging plants with.
We planted the bulbs in pots which will be easier to bring inside before it gets to cold. We’re putting 3-4 bulbs in the larger pots and 2 bulbs in the smaller pots.
Callas are planted 4” deep, root side down. They like plenty of sun and regular watering.

Planting Garlic


Last year was our first year planting garlic. We ordered from Gurneys, planted in the spring and had a bumper crop. The bulb we’re planting this year is from last year’s crop. I’m not sure if it will grow. I’ve read that garlic should be planted in the fall for the following year’s garden because it needs to get cold. I did have this garlic in the refrigerator for about a month, so I’m hoping that will work… if not, we’ll plant again in the fall.
Garlic cloves should be planted 1” deep, 4” apart, root side down, in full sun. When the tops turn yellow, the garlic is ready to be harvested and dried.

Rhubarb Wine Recipe


13 quart Stoneware Crock (3 gallons, 1 quart)
5 pounds of rhubarb, finely chopped
3 quarts of hot water
Place rhubarb into the crock. Pour hot water over the rhubarb. Stir once a day for a week. Crock may be covered lightly with a paper towel or unbleached cheese cloth if desired.

**If rhubarb has been frozen, allow to thaw before adding the hot water.

After 1 week:
Separate the juice from the rhubarb using a strainer and coffee filter.
Add enough water to the rhubarb juice to make 2 gallons.
Wash and dry the Stoneware Crock.
Pour the juice back into the Stoneware Crock.
Add 6 pounds of sugar.
Let stand “until it quits working”. The crock maybe covered lightly with a paper towel or unbleached cheese cloth during this time.
Strain the juice through a coffee filter or unbleached cheese cloth.
Bottle, leaving the cap or cork loose.

**This wine does not have any preservatives added, so it does not keep for long periods of time.

Extra Rhubarb

What are we doing with our extra rhubarb this summer?

Sharing with friends and making wine.

We have an ice cream pail in the freezer, and whenever we have extra, the rhubarb is chopped up finely and placed in the pail. When we have 5 pounds of rhubarb saved, we'll start a batch of wine.

Thursday, May 27, 2010

Harvesting Rhubarb

There's a potluck tomorrow, the rhubarb is growing, so I'm making rhubarb crisp. I used to think that rhubarb was cut from the plant. A few years ago, I learned that rhubarb is actually pulled from the base of the plant and new stalks grow where the old ones are pulled. I pull the larger stalks that are firm and leave the thinner ones to grow.

Here's a picture of a stalk that has been pulled. Notice the funny looking end at the base of the stalk? That will be cut off and composted.


After the rhubarb is pulled, I cut off the poisonous leaves and leave them laying in the garden to compost. Plants should be spaced about 36" apart. As you can see, these plants are too close together and will need to be split up after the growing season.
It's time to head for the kitchen and make the Rhubarb Crisp!

Rhubarb Crisp


Oven Temperature:
Preheat Oven to 350 degrees.

Arrange shelves to place the baking pan on the middle shelf of your oven.


Crust/Topping:

1 cup Butter

Place Butter in a large bowl to soften while cooking the Filling.

Save the Butter Wrappers on a plate.


Filling:

Preparing the Rhubarb:

Remove and discard leaves, ends, bad spots and any “stringy stuff” from the stalk. Dice stalk into 1/4" pieces. *If rhubarb has not been frozen or is not freshly picked, allow to stand in a jar of cold water for about an hour before using. Rinse well before dicing.

3 cups diced Rhubarb

4 TBSP Cornstarch

1 cup Sugar

1/4 cup water

Place Rhubarb in a pan on the stove.

Mix Cornstarch and Sugar together and pour over the rhubarb.

Add water.

Mix ingredients together and cook on low until thick, stirring occasionally with a heat resistant spatula to keep ingredients from sticking to the bottom of the pan. Remove from heat.


Add 1 tsp. vanilla, stir and set aside to cool.


Crust/Topping:

1 1/2 cups Flour

1 1/2 cups Oatmeal

1 cup Brown Sugar

1/4 tsp Baking Soda

Add the ingredients for the Crust/Filling to the Butter and mix using a pastry blender until mixture is crumbly.

Take 1 1/2 cups of the mixture and set aside for the Topping.

Pour remaining Crust ingredients into a 9”X13” ungreased Baking Pan and pat down using the Butter Wrappers and spatula.


Pour the cooled Filling over the top of the crust.


Sprinkle the Topping mixture evenly over the top of the filling.


Bake for 35 minutes.


Cool before cutting.